
The Fabric Experiment Framework (FABExp) is a Jupyter-based Graphical User Interface (GUI), implemented using ipywidgets and fablib api calls, that allows users to manage their experiments in the Fabric testbed. Users can utilize FABExp to check whether their JupyterHub settings(including keys, config files and etc) are correct. Then users can start their experiments by defining the topology of a slice, submitting the slice, configuring the slice(setting up networks and installing software), running their experiments and viewing the data. The features provided by FABExp allow users to easily keep track of what they have done in the experiment, e.g, a state “DOCKER_INSTALLED” will be saved in the Fabric FIM to indicate users have installed Docker on all the nodes in their slice. Users can check the state of the slice to avoid duplicate execution of code, which may sometimes cause errors. In this article, we illustrate the usage of FABExp by showing how to take advantage of each tab of FABExp to easily manage a Fabric experiment.
Backgrund
Technically speaking, a “slice” and an “experiment” are not the same. A slice is a topology that consists of nodes(VMs) and the network connection among these nodes. An Experiment is the act of running a test (experiment) on a network topology (Slice). However, most Fabric Jupyter notebooks currently contain cells to create the slice, run the experiment, and view results, making it difficult to reuse certain portion of the notebook. In FABExp, we are dividing an experiment into different phases:
- Establish Prerequisites: Define Information about the Components — (e.g., experiment name, slice name, dependencies between components, etc)
- Slice Creation: Define/create the topology (Slice) — (e.g., define the nodes/link and submit), only one component of an experiment
- Experiment Setup: Add/configure software and services needed by the experiment (e.g., enable routes, add services like MFlib, PTP, etc)
- Run Experiment:Invoke commands on the nodes of the experiment (e.g., interactively via login, or via remote execution to run ping tests)
- Monitor Performance: Visualize measurement and monitoring information(Optional)
- Analyze the Results: Collect, process, and visualize the results
Desirable Features of an Experiment Framework
We list below some desirable features that Fabric Experiment Framework should have:
- Conventions (variables) for passing information between the components/phases of an experiment. For example, the value of the IP address of Node_1 can be written in a local file. This file can be passed as the header to other notebooks, say if you have a notebook that runs ping test from Node_2 to Node_1, the variable “Node1_Addr” can be directly used so that no additional code is needed to find out the value of the IP address.
- A mechanism to define dependencies between the components of an experiment and way to automatically fulfill (execute) dependencies. For example: to configure a slice you must submit the slice first. So “SLICE_SUBMITTED” becomes a prerequiste of config_slice.ipynb.
- A mechanism to check for missing pieces (e.g., ssh keys) and dependencies (e.g., PTP not installed/enabled)
- System to keep track of the “status” of the experiment — what has been done, what remains to be done. In FABExp, we use a list of “state” to help keep track of the experiment status e.g, “SLICE_DEFINED”, “SLICE_SUBMITTED”, “SLICE_CONFIGURED”, “MEAS_NODE_ADDED”, “MFLIB_INITIATED”, “ELK_INSTRUMENTIZED”, “PROMETHEUS_INSTRUMENTIZED”, “DOCKER_INSTALLED”, “PTP_INSTALLED”
Usage of Fabric Experiment Framework(FABExp)
In this section, we will illustrate the usage of FABExp. We are showing the usage with fablib version 1.6 but it works with latest versions.
Start the GUI
Users can go to the experiment folder and open welcome.ipynb. Then run the first code cell in the notebook. A GUI will pop up asking for experiment name.
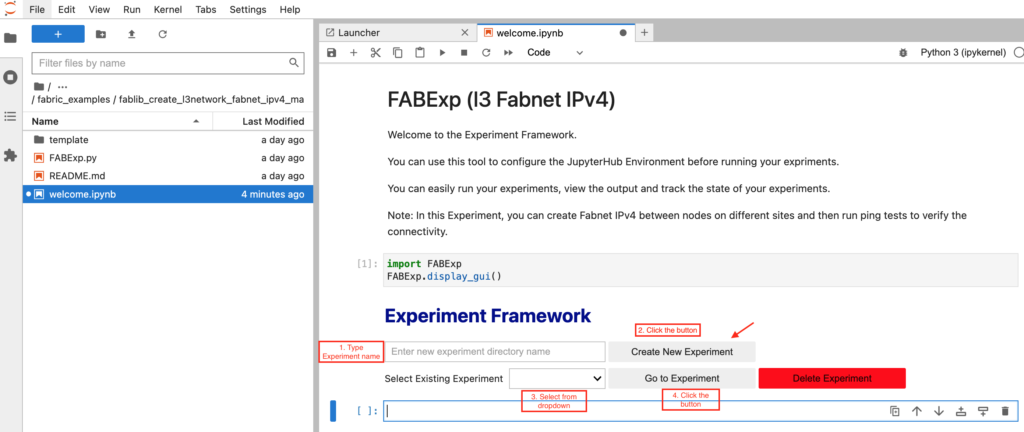
After the users enter the experiment name click the “Create New Experiment” button, a new folder will be created(see it on the left side) using the name you input. All the activities of the experiment will be saved in the newly created folder (without affecting the template folder).
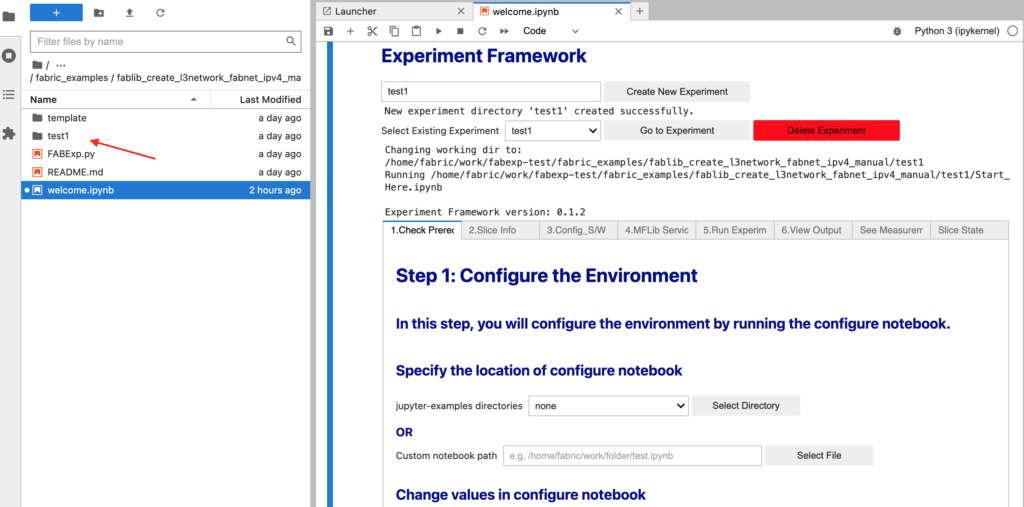
Then users can select the newly created experiment from the dropdown and click the “Go to Experiment” button. A new panel with different tabs will pop up. Be careful when clicking the “Delete Experiment” button since it will delete the newly created folder.
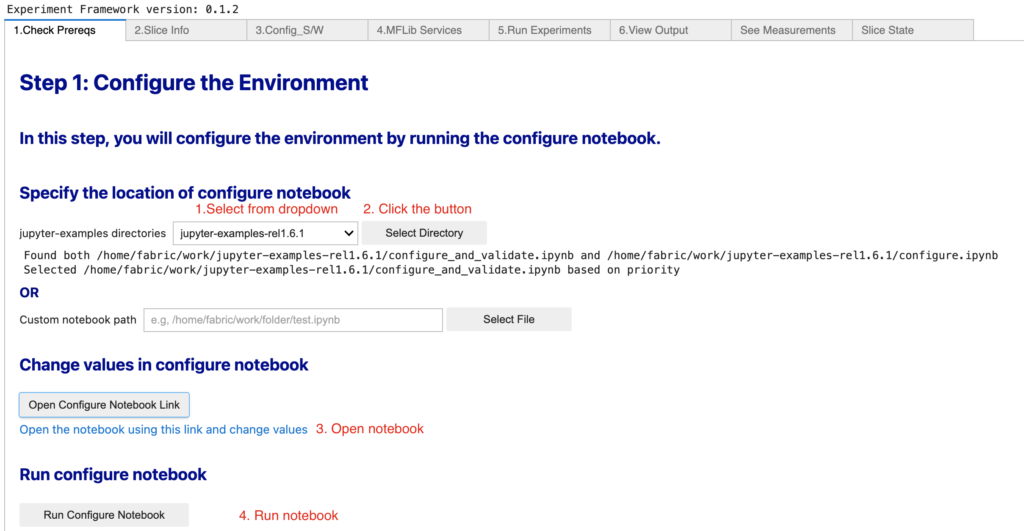
Check Prerequisites Tab
In this tab, users can specify the location of the configure notebook to check their JH settings. The dropdown scans the directories with names “jupyter-examples-relXXX” in the HOME dir(/home/fabric/work/). Since jupyter-examples-rel1.6.1, a new notebook book called “configure_and_validate.ipynb” has been added as a new approach to check the JH settings, if both “configure.ipynb” and “configure_and_validate.ipynb” exist in the selected direcory, FABExp will select “configure_and_validate.ipynb” based on priority.
Note: Experienced users do not need to go through this step if they are sure their JH settings are correct. New users only need to do it once.
If users run “configure_and_validate.ipynb”, they should see the following(same as the output when users manually run this notebook) Ignore the path in the last line. The check process will stop here.

When users click the “Run Configure Notebook” button, if the selected file is “configure.ipynb”, users are expected to see the following:
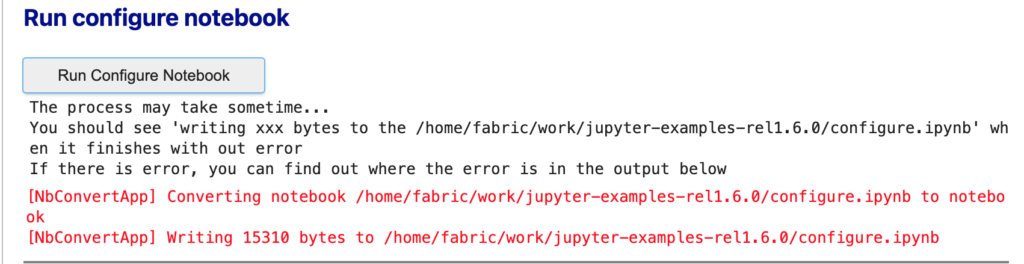
When users run “configure.ipynb”, they are expected to use FABExp to check their JH settings: Check the existence of files, check the content of files and library versions.

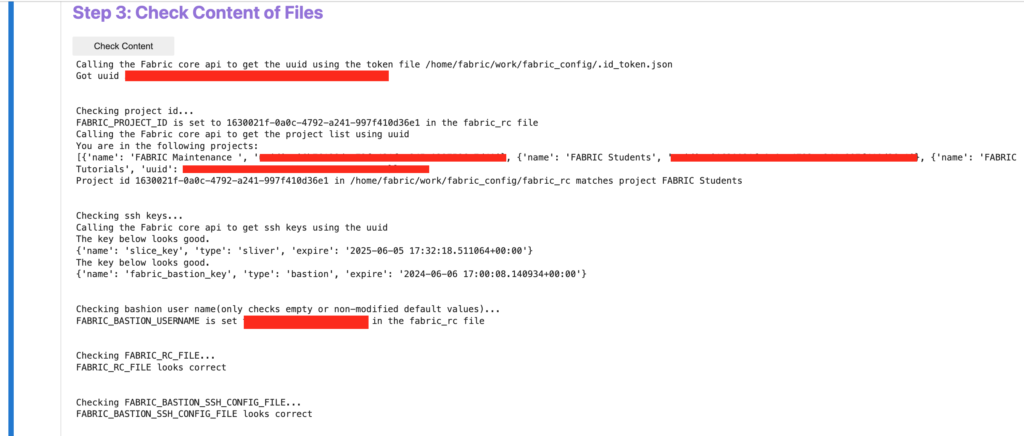
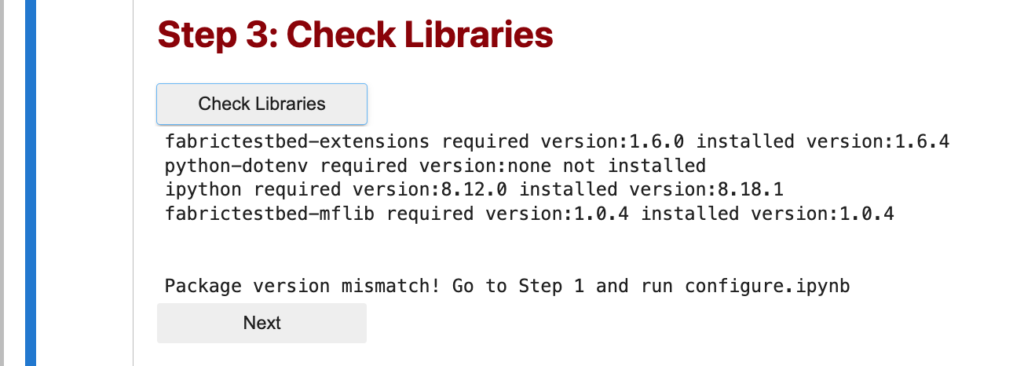
Please make sure that the “requirements.txt” in the selected dir have the correct library versions.
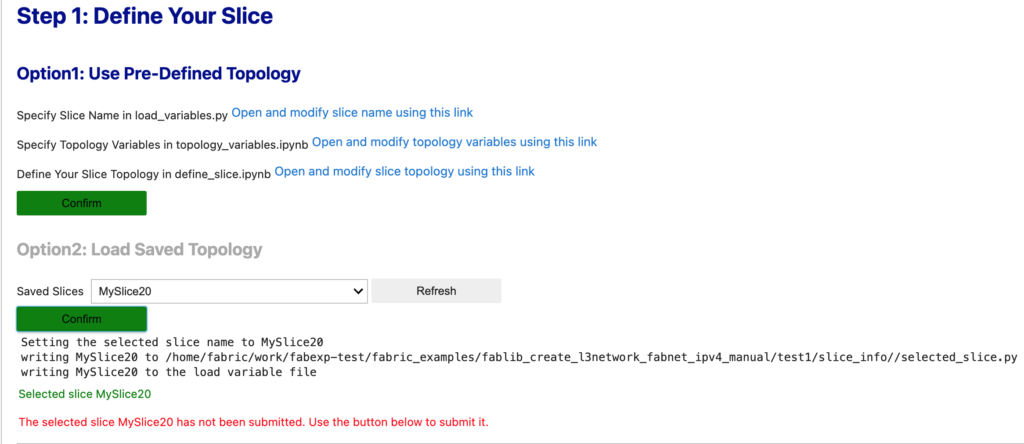
Define Your Slice
Users can define their slice using the three files listed: slice name in load_variables.py, topology variables in topology_variables.ipynb and slice topology in define_slice.ipynb.
FABExp checks whether the given slice name is valid or not(whether slice with the same name has been submitted).
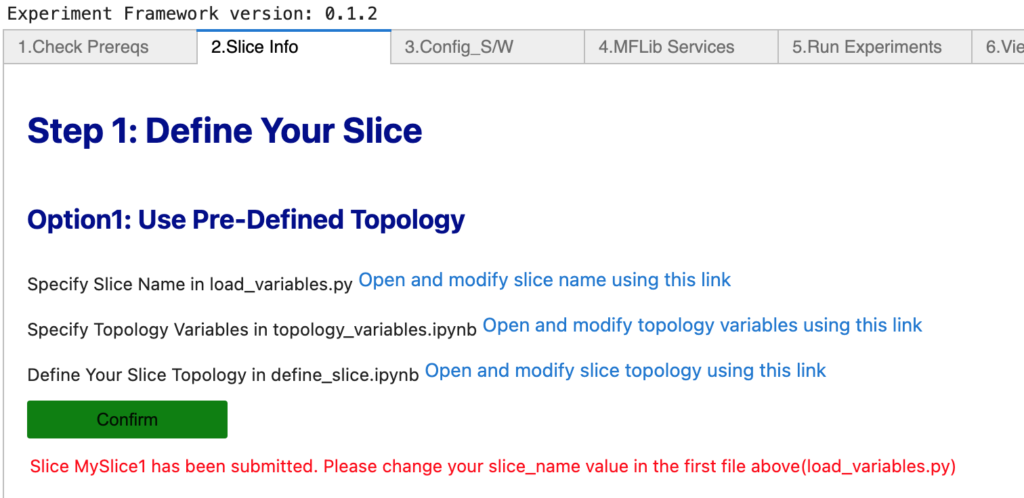
If the name is ok, users will see:

If users change the content in any of these files, they need to save the file and click the “Confirm” button(No need to manually run the notebooks). Then they can submit the slice using the “Submit slice button”. For option 2, if users close the GUI and the next time when they come back, they can load the saved topology(no matter the slice itself has been submitted or not) using the confirm button.
By clicking the “Submit slice” button, users will see the same output as what they will see in the notebook output cell. At the end of the output, users should see something similar to the following. The “State” button prints the current state of the slice.

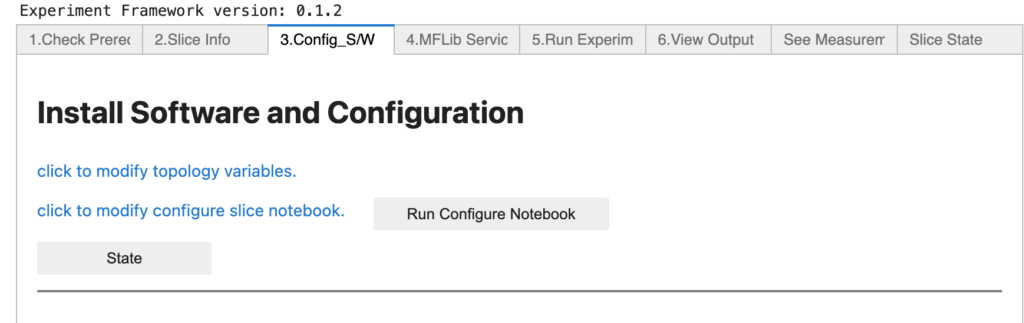
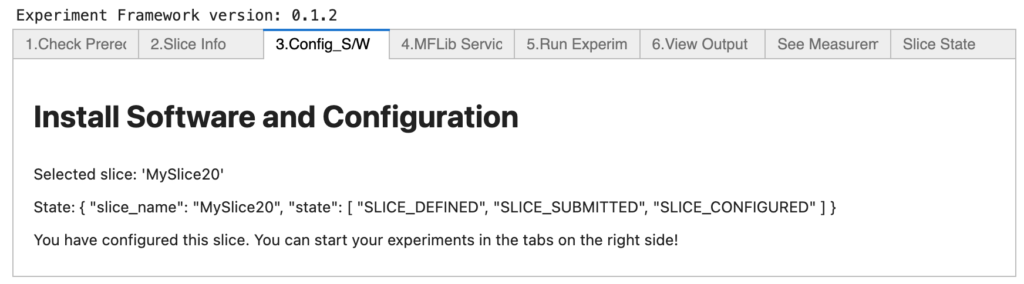
Configure Your Slice
In the “Config_S/W” tab, users can modify “topology_variables.ipynb” and “config_slice.ipynb” to provide any information how they want to config the slice. By default, the notebooks are working. Click “Run Configure Notebook”. Users should see the following before and after slice configuration:
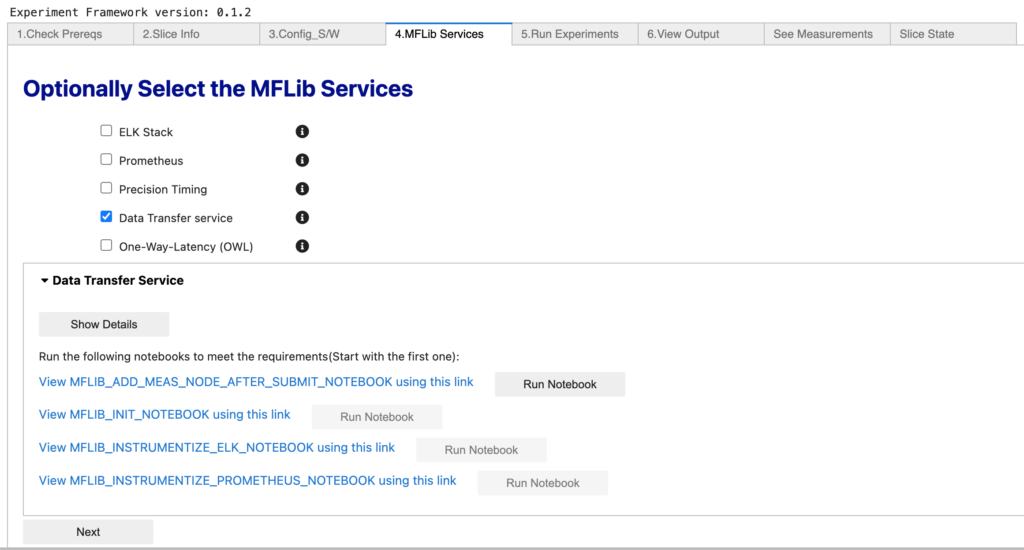
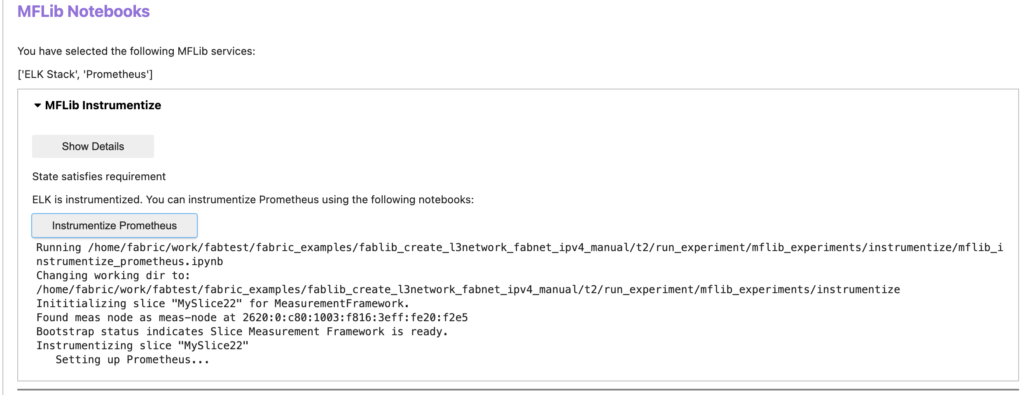
Add Measurement Framework Services (optional)
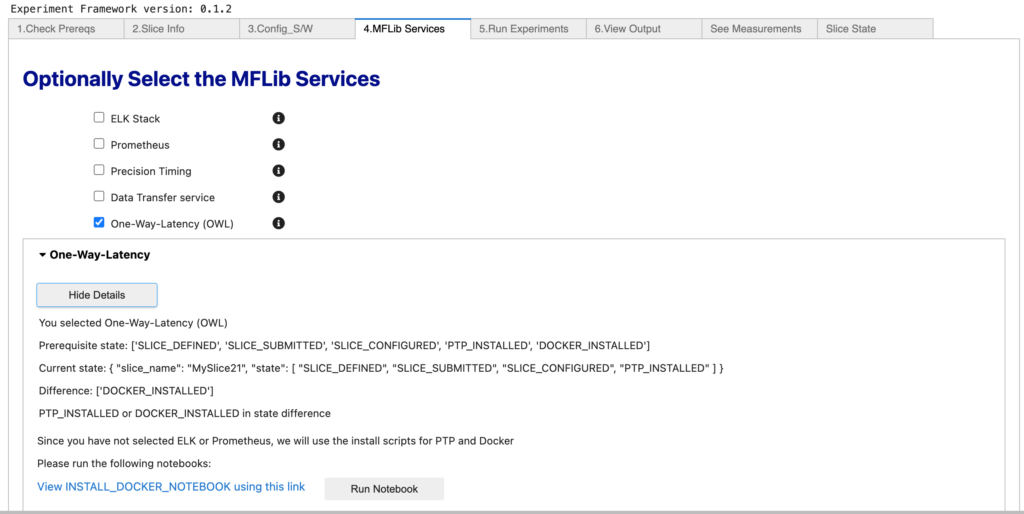
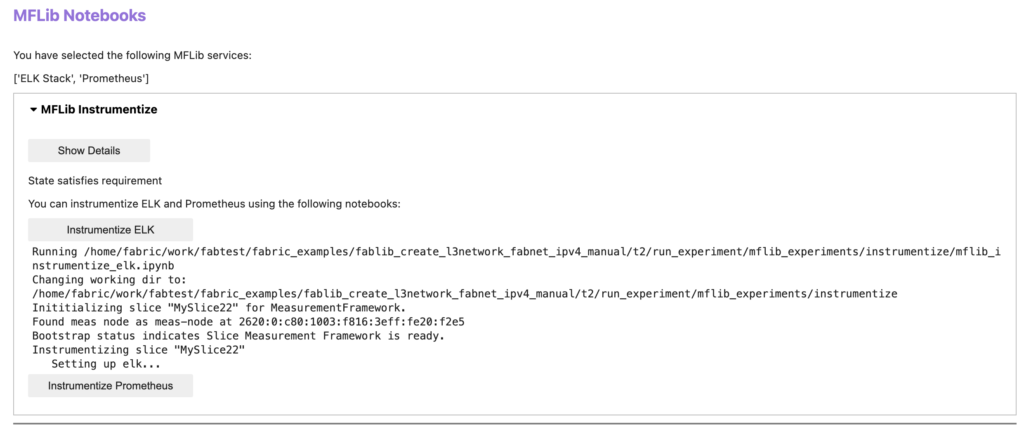
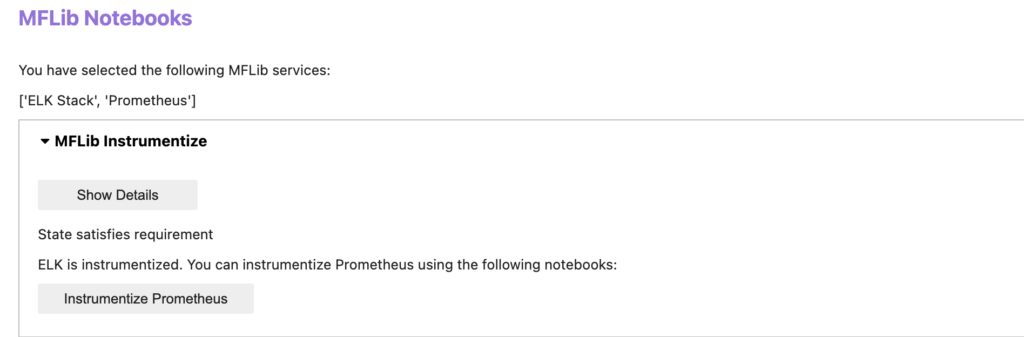
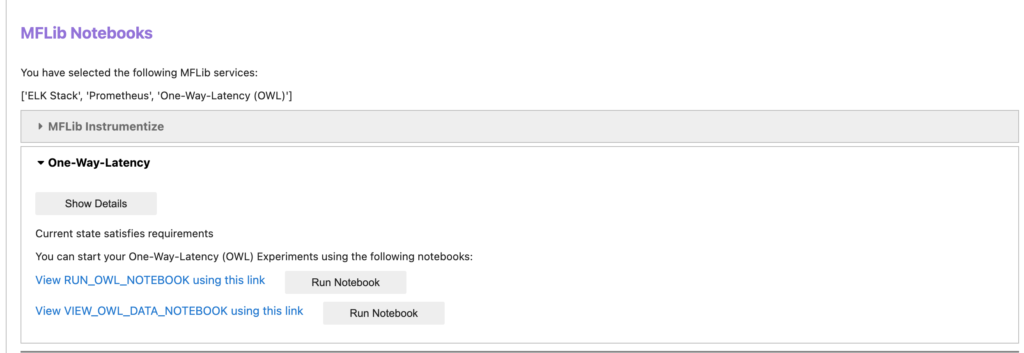
The Measurement Framework provides different services that help the users collect and visualize the data from their slice. In this tab, users will see a list of services available including ELK, Prometheus, Data Transfer, Precision Timing and One Way Latency(OWL). When users check the checkboxes, the corresponding accordion will be displayed showing “What users need to do” to satisfy the requirements of running the selected mflib experiments. (Basically running notebooks to satisfy the requirements). If users click the “show details” button
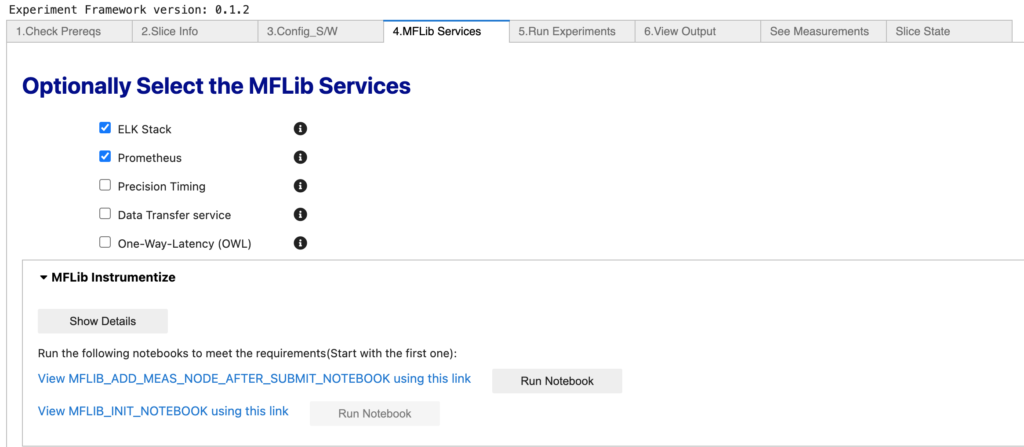
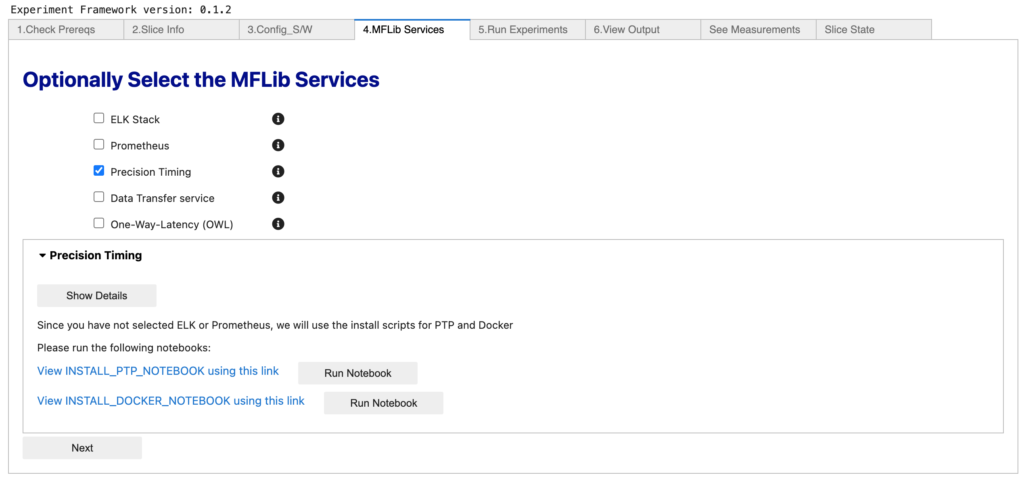
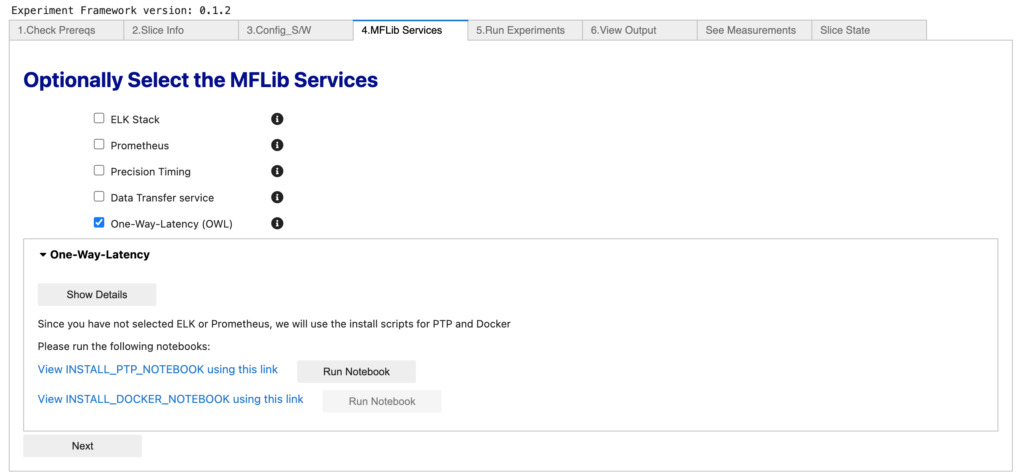
The GUI will be automatically updated if the “state” changes. For example, in the figure above, the One Way Latency experiment requires the installation of PTP and Docker. Once users finishes running the “INSTALL_PTP_NOTEBOOK”, they will only be asked to run “INSTALL_DOCKER_NOTEBOOK”.
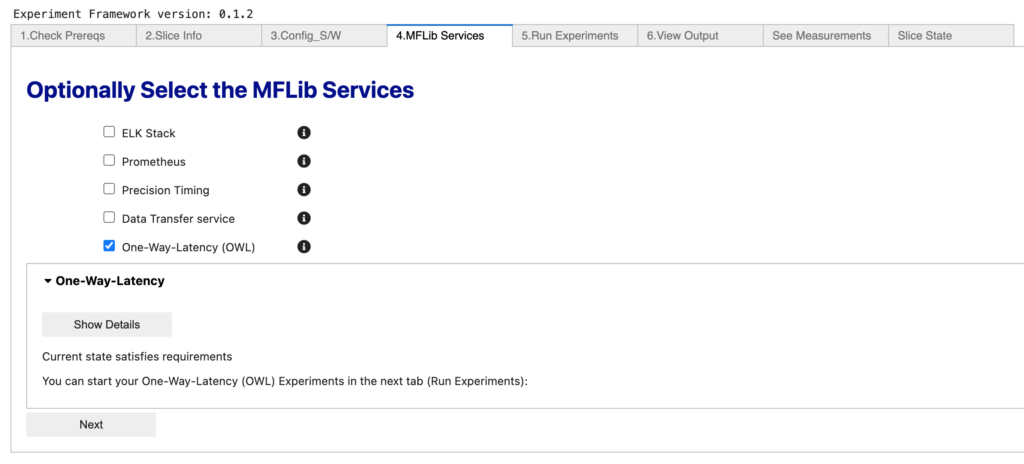
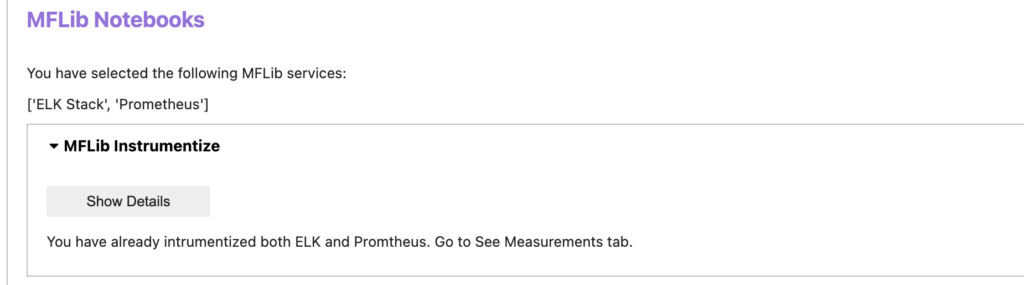
Once all the requirements are satisfied, users will see the following and they can go to the next tab to run the experiments.
Run Experiments
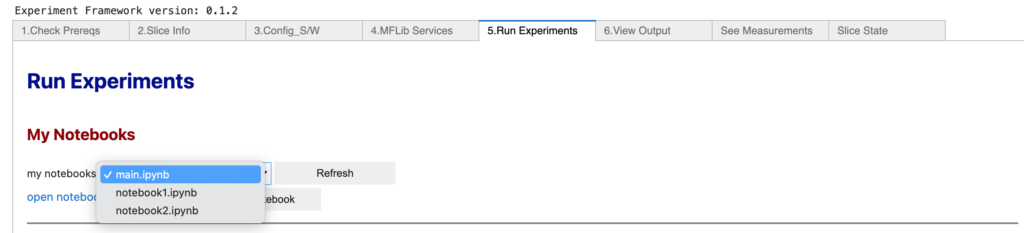
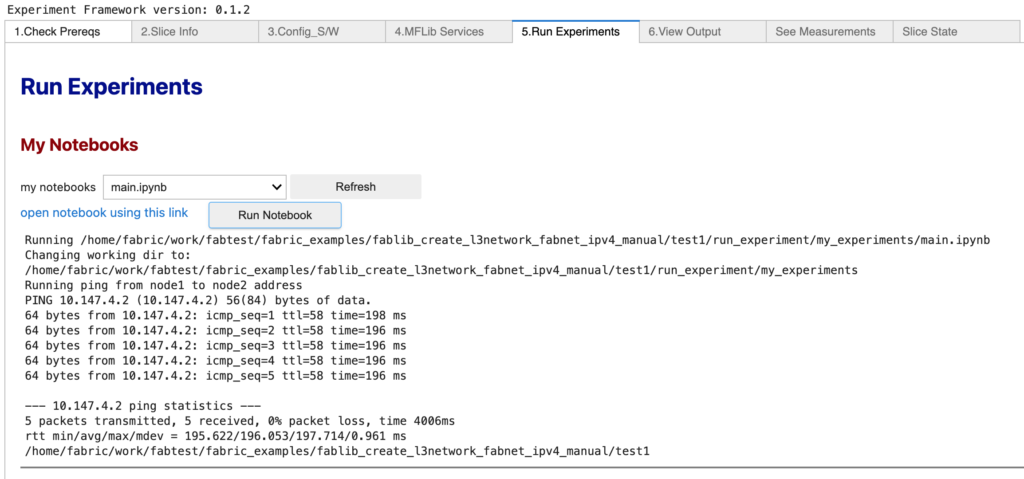
The first section in this tab show the notebooks for this experiment. For example, in this Fabnet IPv4 experiment, the notebook “main.ipynb” just runs ping test from node1 to node2 to verify the network connectivity. There are other notebooks, e.g, notebook1 and notebook2, which are left empty for now but users can add the code of their own experiment to these notebooks, save them and click the “Run Notebook” button so that they can run other experiments using this slice.
If users only cares about the default experiment, e.g, the ping test, they can just click the “Run Notebook” button to see the results.
If users have selected any mflib services in the previous tab, they will see the corresponding experiment notebooks they can open and use.
The last part of this tab allows users to ssh into a selected node by clicking the “Open Terminal” button so that users can type commands in the terminal to run other experiments.

View Output
This tab is designed to help users view their experiment data assuming they have separate notebook e.g, notebook1.ipynb and notebook2.ipynb for this purpose. The example experiment we have here is a ping tests where the output is displayed in the same main.ipynb.
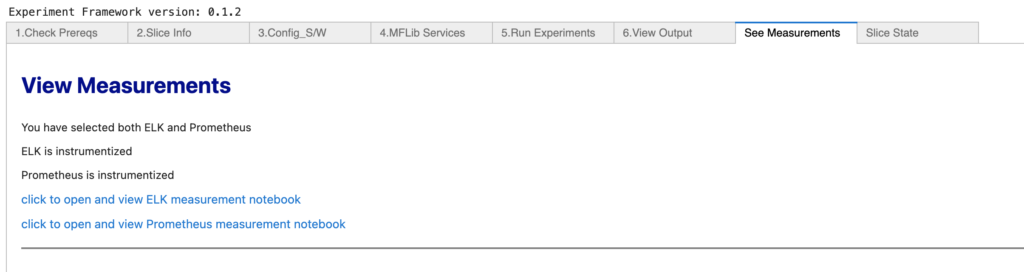
See Measurements
If users have instrumentized ELK/Prometheus based on what they selected, they will see the notebooks in this tab showing them how to set up SSH tunnels to access the Kibana/Grafana web interfaces, where they will see various dashboards visualizing the collected measurement data from their slice.
Slice State
Users can always find the status of their experiments: the name of the slice and what has been done in this slice.

Conclusion
Fabric Experiment Framework (FABExp) is a Jupyter-based GUI that helps users manage their experiments in the Fabric testbed. With this tool, users can easily keep track of their experiment status and avoid some common pitfall when running experiments.