
Overview
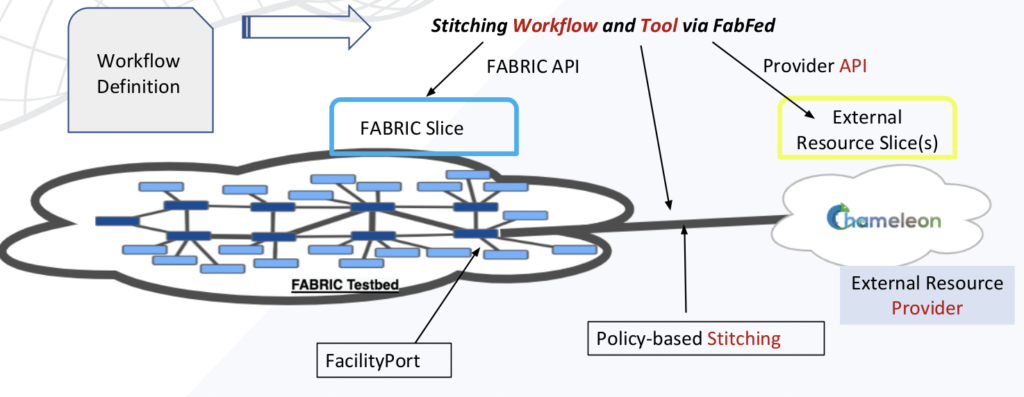
The FABRIC Federation Extension (FabFed) is a software stack that provides the package and toolkit for the FABRIC users to run large experiments across multiple testbed and cloud providers. Under a “tool-based federation” framework, FabFed integrates external network and cloud resources into a FABRIC slice in a fully automated and orchestrated fashion.
Key Concepts
Provider
A testbed, testbed or cloud that runs independent administration and control of a cyber infrastructure. FABRIC, Chameleon, CloudLab, Internet2 AL2S, ESnet, Amazon AWS and Google Cloud are all examples of a provider. They normally have independent user identity and API management. There is a special kind of provider called “Service Provider”, which deploys experiment middleware on top of the cyberinfrastructure resources. For example, JANUS is a DTN-as-a-Service provider that helps with tooling of data access and transfer experiments.As of this writing, the following providers are supported:
- FABRIC: https://portal.fabric-testbed.net
- Chameleon AKA Chi: https://www.chameleoncloud.org
- SENSE (AWS, GCP, AutoGOLE): https://sense.es.net
- Cloudlab: https://cloudlab.us
- JANUS DTNaaS
Workflow Definition
A FabFed proprietary description of the experiment in a terraform-like declarative language. Each experiment is described by one or multiple .fab YAML files under a file system folder. The description includes pointers to user credentials (under ~/.fabfed), provider access statements, resource allocation and interdependency statements.
Workflow Session
A FabFed workflow consists of workflow definition, interaction with providers and stitching. The same workflow can be executed many times, each representing a workflow session with a unique session name. Each session has persisted context under ~/.fabfed/sessions/ to maintain states across workflow operations.
Stitching Policy
Resources from different providers are connected via layer-2 and layer-3 networks to form a larger experiment. This process is defined by a stitching policy that tells the order of interactions with the providers, and the interdependency of resource parameters. These are also called stitching options. For example, an experiment with FABRIC and Google Cloud requires to firstly create a GCP Interconnect and then extract the GCP Interconnect pairing key to pass to FABRIC to create an AL2S Cloud Connect service that bridges FABRIC and GCP. The stitching policy is currently predefined by the FabFed software and can be overridden by the user input in the workflow definition files.
Installation
Download and install:
git clone https://github.com/fabric-testbed/fabfed

cd fabfed

pip install -r requirements.txt

pip install -e .
Verify the installation:
fabfed --help
fabfed workflow --help
fabfed sessions --helpConfiguration
Credential Files
The Fabfed credential file is a YAML file that contains account information and keying material for each provider using sections aka profiles. A template can be found at config/fabfed_credentials_template.yml. The credential file is referred from the workflow definition file, which will be described later.The table below shows two sections or profiles: fabric and chi.
# Sample Fabfed Credential File

fabric:
   bastion-user-name:
   token-location:
   bastion-key-location:
   project_id:
   slice-private-key-location:
   slice-public-key-location:

chi:
   project_name:
   key_pair:
   user:
   password:
   slice-private-key-location:
   slice-public-key-location:
Workflow Definition (.fab) Files
The FabFed workflow definition uses a declarative DSL that adopts some of the terraform syntax. The definition normally consists of three sections: provider, config and resource. A detailed document on the FabFed workflow definition design can be found at docs/workflow_design.md.
An Example
We use FABRIC and Chameleon with layer-2 network stitching as an example to explain the workflow definition structure. The experiment involves the creation of a node on the FABRIC testbed and a node on the Chameleon testbed. In addition, two networks, one at each end, are created and stitched allowing the two nodes to communicate in a secure and isolated fashion.
The complete FabFed workflow definition for this example can be found in config/chi_to_fabric_stitching.fab.
Dependencies
The simplified snippet below, taken from the complete definition, highlights two types of dependencies: the internal dependencies between each node and its corresponding network and the external dependency between the two networks.
resource:
  - network:                  # network resources
      - chi_network:
          provider: '{{ chi.chi_provider }}'

      - fabric_network:
          provider: '{{ fabric.fabric_provider }}'
          stitch_with: '{{ network.chi_network }}'
          interface: '{{ node.fabric_node }}'

  - node:                     # node resources
      - fabric_node:
          provider: '{{ fabric.fabric_provider }}'

      - chi_node:
          provider: '{{ chi.chi_provider }}'
network: '{{ network.chi_network }}'Internal dependency is used when two resources belong to the same provider. For example, the chi node refers to the chi network. This is specific to the Chameleon API which requires the name of an existing network during node creation.
The other internal dependency is on the FABRIC side. This time around the fabric Layer-2 network wants to know the interfaces of the nodes attached to it.
The external dependency is expressed by the stitch_with attribute. The FabFed controller consults the stitching policy file to select a suitable port that is defined for the two providers chi and fabric. Once the port is selected it determines the consumer/producer relationship which may trigger a reordering of these resources as the producer would need to be processed first. This basically means that the stitch_with dependency can be defined in either the fabric network or the chi network.
For the chameleon to fabric stitching, the chi network is the producer. Upon creation, it provides a VLAN to the fabric network which uses the VLAN to create the facility port and attach its interface in addition to the fabric node interfaces as mentioned above.
Stitching Policy
The FabFed controller supports a policy-defined network stitching. It consults a policy file to pick a suitable stitch_port between two providers and determine the producer/consumer relationship. For the chi and fabric scenario described above, there is only one stitch-port and that the chi network is the producer.
Below is a snippet from the policy file showing the single stitch-port that is available from chi to fabric. The groups are used to help determine the consumer/producer relationship. The complete policy can be found at fabfed/config/sample_policy.yaml.
fabric:
 group:
     - name: STAR
       consumer-for:
           - chi/STAR
chi:
 stitch-port:
   - site: STAR
     member-of:
       - STAR
     device_name: Chameleon-StarLight
     preference: 100 # higher is preferred

 group:
   - name: STAR
     producer-for:
       - fabric/STAR
For FABRIC and SENSE stitching, many stitch-ports are available with bi-directional consumer/producer relationships. For GCP, sense is the producer and FABRIC is the consumer while for AWS fabric is the producer and sense is the consumer.
The stitch-port with the highest preference gets selected but one can use the stitch_option attribute to select a desired stitch-port. See the sense-aws and sense-gcp workflows under the examples directory.
CLI Command Reference
To list available FabFed commands, execute fabfed -h.
usage: fabfed [options]

Fabfed

Examples:
      fabfed workflow --var-file vars.yml --session test-chi -validate
      fabfed workflow --config-dir . --session test-chi -validate
      fabfed stitch-policy -providers "fabric,sense"

positional arguments:
  {workflow,sessions,stitch-policy}
    workflow            Manage fabfed workflows
    sessions            Manage fabfed sessions
    stitch-policy       Display stitch policy between two poviders

optional arguments:
  -h, --help            show this help message and exit
The subcommands and common options are listed in the tables below. We will elaborate each subcommand in the following sections.
| Name | Description |
|---|---|
| workflow | Manage fabfed workflows |
| sessions | Manage fabfed sessions |
| stitch-policy | Display stitch policy between two providers |
| Name | Description |
|---|---|
--config-dir | It specifies the directory in which FabFed will pickup any file ending with the .fab extension. If this option is not present, the current directory is used. |
--var-file | It is used to override the default value of any variable. It consists of a set of key-value pairs with each pair written as key: value. At runtime, all variables found in an assembled configuration must have a value other than None. The parser will halt and throw an exeption otherwise. |
--help | It shows above if in doubt |
fabfed sessions
usage: fabfed [options] sessions [-h] [-show] [-json]

optional arguments:
  -h, --help  show this help message and exit
  -show       display sessions
  -json       use json format
Fabfed tracks a workflow using a friendly session name provided by the user. It stores all information relevant to a session under ~/.fabfed/sessions. In particular it associates the directory where the workflow definition resides with the session. This association is stored in a meta file. When operating an experiment, the directory can be specified using the –config-dir option and if not the current directory is assumed.
The state of the workflow is also stored under ~/.fabfed/sessions and is used during the create phase and destroy phase. Finally the -show option displays the state in YAML and the -json flag can be used for json.
Make sure the FabFed tool has been installed and -show display an empty list of sessions.
(fabfed) aes@scira01:fabfed/chi_to_fabric_exp$ fabfed sessions -show
[]
fabfed workflow
usage: fabfed [options] workflow [-h] [-c CONFIG_DIR] [-v VAR_FILE] -s SESSION [-p POLICY_FILE] [-validate] [-apply] [-init] [-plan] [-use-remote-policy] [-show] [-summary] [-json] [-destroy]

optional arguments:
  -h, --help            show this help message and exit
  -c CONFIG_DIR, --config-dir CONFIG_DIR
                        config directory with .fab files. Defaults to current directory.
  -v VAR_FILE, --var-file VAR_FILE
                        Yaml file with key-value pairs to override the variables' default values
  -s SESSION, --session SESSION
                        friendly session name to help track a workflow
  -p POLICY_FILE, --policy-file POLICY_FILE
                        Yaml stitching policy file
  -validate             assembles and validates all .fab files in the config directory
  -apply                create resources
  -init                 display resource ordering
  -plan                 shows plan
  -use-remote-policy    use remote policy
  -show                 display resources
  -summary              display resources
  -json                 use json output. relevant when used with -show or -plan
  -destroy              delete resources
-init flag
The -init flag can be used to see the ordering of the resources and also to view the stitching information. Here we can see that chi is the producer as mentioned above.
(fabfed)$ fabfed workflow --session chi_fabric_exp -init -summary
    ...
    stitch_info:
      consumer: fabric
      producer: chi
      stitch_port:
        device_name: Chameleon-StarLight
        member-of:
        - STAR
        preference: 100
        site: STAR
    ...
-plan flag
The -plan can be used to make sure all is well and adds the resources to providers allowing validate the resources. It is also useful to see the pending state. Here we can see that the fabric network is pending. This is because the -plan does not create resources and as mentioned above, the fabric network depends externally on the chi network.
(fabfed)$ fabfed workflow --session chi_fabric_exp -plan
...
- !ProviderState
  attributes:
    name: chi_fabric_exp
  failed: {}
  label: fabric_provider@fabric
  network_states: []
  pending:
  - fabric_network@network
...
-apply flag
The -apply is used to create resources. It is worth noting that the -apply was designed to always converge to the desired state. It is highly recommended to try -apply again and again when facing networking issues or other occasional failures happening on the provider side (server-side)
From the output of applying the chi to fabric workflow, we can see that all the resources were created just fine.
(fabfed)$ fabfed workflow --session chi_fabric_exp -apply

2023-06-30 21:47:46,867 [fabfed.py:90] [INFO] nodes=2, networks=2, services=0, pending=0, failed=0
-show flag
The -show can be used to view the state of the workflow or the experiment. The snippet below displays the state of the chi resources. We can see that the chi node is active and has a management ip. We can also see that the chi network has an interface with the provider set to chi and the VLAN set to 3309.
Note the user and the keyfile. These will be used down below to ssh into the chi node and ping the Fabric node’s dataplane ip.
(fabfed)$ fabfed workflow --session chi_fabric_exp -show
…
- !ProviderState
….
  failed:
    chi_node@node: CREATE
  network_states:
  - !NetworkState
    attributes:
      interface:
      - id: ''
        provider: chi
        vlan: 3309
     label: chi_network@network
  node_states:
  - !NodeState
    attributes:
      mgmt_ip: 192.5.86.176
      user: cc
      state: active
      keyfile: /home/aes/FABRIC/my-aes-sliver
    label: chi_node@node
…
The snippet below shows the FABRIC resources. We can see that the resources are active. The FABRIC node has a management IP and that the FABRIC network consumed the VLAN 3309 produced by the Chameleon network.
(fabfed)$ fabfed workflow --session chi_fabric_exp -show

- !ProviderState
  network_states:
  - !NetworkState
    attributes:
      interface:
      - id: Chameleon-StarLight-Chameleon-StarLight-int
        vlan: '3309'
     state: Active
    label: fabric_network@network
  node_states:
  - !NodeState
    attributes
      mgmt_ip: 2001:400:a100:3030:f816:3eff:fe00:f1ca
      state: active
      dataplane_ipv4: 192.168.100.177
    label: fabric_node@node
-destroy flag
The -destroy to delete all resources. If successful, the FabFed tool deletes the session directory associated with the experiment. Note that the -destroy operation carries out the deletion with the providers in the reverse order of the -apply operation. Just like the -apply it is recommended to try it a couple of times when facing intermittent issues.
(fabfed)$  fabfed sessions -show
- config_dir: /home/aes/FABRIC/fabfed/examples/stitch
  session: chi_fabric_exp

(fabfed)$ fabfed workflow --session chi_fabric_exp -destroy

(fabfed)$ fabfed sessions -show
[]fabfed stitch-policy
usage: fabfed [options] stitch-policy [-h] -providers PROVIDERS [-c CREDENTIAL_FILE] [-p POLICY_FILE] [--profile PROFILE] [-use-remote-policy]

optional arguments:
  -h, --help            show this help message and exit
  -providers PROVIDERS  two comma separated providers from chi,fabric,cloudlab, or sense
  -c CREDENTIAL_FILE, --credential-file CREDENTIAL_FILE
                        fabfed credential file. Defaults to ~/.fabfed/fabfed_credentials.yml
  -p POLICY_FILE, --policy-file POLICY_FILE
                        Yaml stitching policy file
  --profile PROFILE     fabric profile from credential file. Defaults to fabric
  -use-remote-policy    use remote policy
When stitching networks across provider use stitch-policy to discover available stitch information.
Practical Examples
Under the fabfed/examples folder, one can try any of these examples. We skip the FABRIC+Chameleon example as we have used it in explaining the workflow definition and session operations.
FABRIC + CloudLab
Make sure a cloudlab profile exists in ~/.fabfed/fabfed_credentials.yml
cloudlab:
  project: fabfed
  certificate: /Users/xiyang/.fabfed/cloudlab/cloudlab-decrypted.pem
  user: essiarib
  slice-private-key-location: /Users/xiyang/.ssh/cl_ae.key
The cloudlab-decrypted.pem file contains the concatenated private key and certificate for the CloudLab API access. Review config.fab under the examples/cloudlab/ folder. Start a workflow session with -plan to verify the workflow definition and provider configuration. No error should show up.
$ cd examples/cloudlab
$ fabfed workflow -s fab-cl-inf -plan
2023-06-29 13:48:18,803 [policy_helper.py:144] [INFO] Found 1 stitch ports
2023-06-29 13:48:18,804 [policy_helper.py:198] [INFO] Using stitch port for providers=['cloudlab', 'fabric']:StitchInfo(stitch_port={'site': 'UTAH', 'member-of': ['UTAH'], 'device_name': 'Utah-Cloudlab-Powder', 'preference': 100}, producer='cloudlab', consumer='fabric', producer_group={'name': 'UTAH', 'profile': 'fabfed-stitch-v2', 'producer-for': ['fabric/UTAH'], 'provider': 'cloudlab', 'consumer-for': []}, consumer_group={'name': 'UTAH', 'consumer-for': ['cloudlab/UTAH'], 'provider': 'fabric', 'producer-for': []})
...
In this example, a FABRIC network is stitched with a CloudLab network. The stitching policy uses the default definition in fabfed/controller/policy.yaml, where the provider cloudlab group UTAH produces stitching parameters (layer-2 VLAN by default) to be consumed by the provider fabric group UTAH. The shared layer-3 parameters are used to configure IP addresses on both ends of the layer-2 network at the FABRIC and CloudLab to create an IP connectivity.
cloudlab:
  stitch-port:
      - site: UTAH
        member-of:
          - UTAH
        device_name: Utah-Cloudlab-Powder
        preference: 100 # higher is preferred
  group:
    - name: UTAH
      profile: fabfed-stitch-v2
      producer-for:
        - fabric/UTAH
Then run the workflow with -apply. (Note: CloudLab does not like a session name with underscore _, so avoid it in this type of workflow.)
$ fabfed workflow -s fab-cl-inf -apply
...
2023-06-29 17:15:08,251 [fabfed.py:75] [INFO] nodes=3, networks=2, services=0, pending=0, failed=0
Upon success, one can review a manifest of the allocated resources by both FABRIC and CloudLab.
$ fabfed workflow -s fab-cl-inf -show
	...
  node_states:
  - !NodeState
    attributes:
      dataplane_ipv4: 192.168.1.1
      host: 155.98.36.91
      keyfile: /Users/xiyang/.ssh/cl_ae.key
      mgmt_ip: 155.98.36.91
      name: fab-cl-inf-cloudlab_node-0
      site: utah
      user: essiarib
	...
  - !NodeState
    attributes:
      dataplane_ipv4: 192.168.1.2
      host: 155.98.36.84
      keyfile: /Users/xiyang/.ssh/cl_ae.key
      mgmt_ip: 155.98.36.84
      name: fab-cl-inf-cloudlab_node-1
      site: utah
      user: essiarib
	...
  node_states:
  - !NodeState
    attributes:
	...
      dataplane_ipv4: 192.168.1.130
      dataplane_ipv6: fe80::bc2:c448:416a:deab
      flavor: '{''cores'': 2, ''ram'': 8, ''disk'': 10}'
      host: 2001:1948:417:7:f816:3eff:fefe:5494
      id: fcc3b2b6-0300-4764-9d09-a3b97359638c
      image: default_rocky_8
      jump_host: bastion.fabric-testbed.net
      jump_keyfile: /Users/xiyang/.ssh/fabric-bastion.key
      jump_user: xiyang_0016836331
      keyfile: /Users/xiyang/.ssh/fabric-sliver.key
      mgmt_ip: 2001:1948:417:7:f816:3eff:fefe:5494
      name: fabric_node0
      site: UTAH
      slice_name: fab-cl-inf
      state: active
      user: rocky
The above excerpt of the -show manifest provides us access information for the 2x CloudLab hosts and the 1x FABRIC host. Once logged in, we can use the dataplane IPs for data-plane tests. In this example, a single IPv4 subnet is used to assign addresses to the three hosts that are stitched with Layer-2 VLAN connections. We can ssh into these hosts via the provided public IP, user login and keypair name, and verify the connection by ping between the three IP addresses 192.168.1.1,192.168.1.2, 192.168.1.130.
FABRIC + CloudLab with JANUS Service
Review the config.fab file under the examples/cloudlab/service folder. As we can see that workflow definition has additional statements for the JANUS provider and service resource.
provider:
	...
  - janus:
      - janus_provider:
          url: "{{ node.fabric_node }}"
          username: admin
          password: admin
          token:

resource:
	...
  - service:
      - dtn_service:
          provider: '{{ janus.janus_provider }}'
          node: [ '{{ node.cnode }}', '{{ node.fabric_node }}' ]
          controller: '{{ node.fabric_node }}'
          image: dtnaas/tools
          profile: fabfed
To start a new workflow session for stitching FABRIC and CloudLab with the added JANUS service layer, run the similar commands below with a unique session name.
$ cd examples/cloudlab/service
$ fabfed workflow -s fab-cl-janus -apply
...
2023-06-29 20:24:27,349 [janus_provider.py:56] [INFO]  Service fab-cl-janus-dtn_service created. service_nodes=[<fabfed.provider.cloudlab.cloudlab_node.CloudlabNode object at 0x10a62f6d0>, <fabfed.provider.fabric.fabric_node.FabricNode object at 0x126505ee0>]
2023-06-29 20:24:27,351 [fabfed.py:87] [INFO] nodes=2, networks=2, services=1, pending=0, failed=0
When the FABRIC+CloudLab workflow session with a JANUS service is successfully created, the following ServiceState excerpt from the -show manifest provides the JANUS controller portal URL.
$ fabfed workflow -s fab-cl-janus -show
	...
  - !ServiceState
    attributes:
      controller_host: 2620:103:a006:12:f816:3eff:fe83:b07
      controller_ssh_tunnel_cmd: ssh rocky@2620:103:a006:12:f816:3eff:fe83:b07 -J
        xiyang_0016836331@bastion.fabric-testbed.net -L 8000:localhost:8000
      controller_url: https://192.168.1.130:5000
      controller_web: http://localhost:8000
      created: true
      image: dtnaas/tools
      name: fab-cl-janus-dtn_service
After logging into the JANUS web portal through the ssh tunnel command, we can verify that both the FABRIC and CloudLab hosts are registered with the JANUS controller. Through the portal we can conduct all the JANUS data access and transfer tests, such as ping and iPerf between these two hosts.
FABRIC + AWS or GCP via the SENSE Provider
We currently use the SENSE orchestrator as a pilot to provide AWS and GCP resources. Make sure a sense profile exists in ~/.fabfed/fabfed_credentials.yml.
sense:
   AUTH_ENDPOINT: https://sense-o.es.net:8543/auth/realms/StackV/...
   API_ENDPOINT: https://sense-o-dev.es.net:8443/StackV-web/restapi
   CLIENT_ID: StackV
   USERNAME: xiyang@es.net
   PASSWORD: somesecret
   SECRET: moresecret
   verify: False
Similar to CloudLab, SENSE provides predefined service profiles to allocate both cloud and network stitching resources. A default service profile name is referred to in the policy.yaml file but can also be overridden by user input in the workflow definition .fab file. For example, in the examples/sense-gcp/config.fab, the stitch_option defines a user-picked SENSE service profile for the stitching. Under the hood a created SENSE service instance with the profile “FABRIC-GCP-INTERCON” will create a VPC with contained subnet and VM resources, and then a GCP Interconnect and Cloud Router that connects between this VPC and the FABRIC network (via Internet2 /AL2S). The stitch_with binds the SENSE/AWS and FABRIC networks using a FabFed system defined policy in the stitching process of this workflow.
resource:
	...
  - network:
      - sense_net:
          provider: '{{ sense.sense_provider }}'
          name: gcp-net
          layer3: "{{ layer3.sense_layer }}"
          peering: "{{ peering.my_peering }}"
          count: 1
          stitch_with: '{{ network.fabric_network }}'
          stitch_option:
              profile: FABRIC-GCP-INTERCON
              vlan: 4
      - fabric_network:
          provider: '{{ fabric.fabric_provider }}'
          layer3: "{{ layer3.fab_layer }}"
          peering: "{{ peering.my_peering }}"
          interface: '{{ node.fabric_node }}'
          count: 1
To provision the workflow session with AWS, for example.
$ cd examples/sense-aws
$ fabfed workflow -s fab-sense-aws1 -apply
...
2023-06-29 17:35:28,345 [fabfed.py:75] [INFO] nodes=2, networks=2, services=0, pending=0, failed=0
Upon success, one can review a manifest of the allocated resources.
$ fabfed workflow -s fab-sense-aws1 -show

node_states:
  - !NodeState
    attributes:
	...
      node_details:
        Image: image+rocky-linux-8-v20230615
        Key Pair: keypair+ezra
        Node Name: vm-1
        Private IP: 10.200.1.2
        Public IP: 34.150.228.97
	...
  node_states:
  - !NodeState
    attributes:
	...
      dataplane_ipv4: 192.168.10.3
      image: default_rocky_8
      jump_host: bastion.fabric-testbed.net
      jump_keyfile: /Users/xiyang/.ssh/fabric-bastion.key
      jump_user: xiyang_0016836331
      keyfile: /Users/xiyang/.ssh/fabric-sliver.key
      mgmt_ip: 2001:400:a100:3030:f816:3eff:fe40:a369
      name: fabric_node0
      site: STAR
      slice_name: fab-sense-aws1
      state: active
      user: rocky
The above excerpt of the -show manifest provides us access information for the FABRIC VM and the AWS VM including public IP, keypair name and user login etc. Once logged in, we can use the dataplane IPs for tests. For example, this experiment workflow has built multiple stitched L2 and L3VPN networks across FABRIC, AL2S and AWS. We now can ping from IP 192.168.10.3 on the FABRIC VM to IP 10.200.1.2 on the AWS VM to verify the end-to-end connection.
FABRIC + AWS or GCP with JANUS Service
Similarly we can add a JANUS service layer on top of the FABRIC and SENSE/AWS or GCP layers. We can use the count=1 to turn the service on or count=0 to turn the service off.
resource:
  - node:
      - sense_node:
          provider: '{{ sense.sense_provider }}'
          name: aws-node
          network: "{{ network.sense_net }}"
          service:
          count: 1
      - fabric_node:
          provider: '{{ fabric.fabric_provider }}'
          site: MAX
          image: default_rocky_8
          count: 1
          nic_model: NIC_Basic
  - network:
      - sense_net:
          provider: '{{ sense.sense_provider }}'
          name: aws-net
          layer3: "{{ layer3.sense_layer }}"
          peering: "{{ peering.my_peering }}"
          count: 1
          stitch_with: '{{ network.fabric_network }}'
          stitch_option:
              name: AGG4
      - fabric_network:
          provider: '{{ fabric.fabric_provider }}'
          layer3: "{{ layer3.fab_layer }}"
          peering: "{{ peering.my_peering }}"
          interface: '{{ node.fabric_node }}'
          count: 1
  - service:
      - dtn_service:
          provider: '{{ janus.janus_provider }}'
          node: [ '{{ node.cnode }}', '{{ node.fabric_node }}' ]
          controller: '{{ node.fabric_node }}'
          image: dtnaas/tools
          profile: fabfed
          count: 1  # SET THIS TO 0 to turn off janus service
When the FABRIC+SENSE/AWS workflow session with a JANUS service is successfully created, the following ServiceState excerpt from the -show manifest provides the JANUS controller portal URL.
$ fabfed workflow -s fab-sense-aws-janus
 -show
	...
  - !ServiceState
    attributes:
      controller_host: 63.239.135.72
      controller_url: https://192.168.10.3:5000
      created: true
      image: dtnaas/tools
      name: fab-sense-aws-janus-dtn_service
After logging into the JANUS web portal through ssh tunneling, we can verify that both the FABRIC and AWS VMs are registered with the JANUS controller. Through the portal we can conduct all the JANUS data access and transfer tests, such as ping and iPerf between the two VM hosts in a hybrid cloud environment.