1. Home
  2. Getting Started
  3. Logging into FABRIC VMs
  1. Home
  2. Technical User Guide
  3. Tips and Tricks
  4. Logging into FABRIC VMs
  1. Home
  2. Technical User Guide
  3. Logging into FABRIC VMs

Logging into FABRIC VMs

Overview

This is a long-ish read, however if you don’t feel confident in understanding the concepts of using SSH, especially with so-called ‘hop’ nodes, we strongly encourage you to read this through.

In order to login to the VM sliver created as part of a FABRIC slice you must utilize a so-called bastion host (aka ‘hop node’ or ‘jump host’).

The purpose of the bastion hosts is two-fold:

  1. Provide better facility security by limiting which IP addresses are allowed to contact your VM sliver from the public Internet.
  2. Help bridge IPv4 users to IPv6 sites and vice versa. Many of the FABRIC sites provide only IPv6 addressable VMs which are unreachable for users coming from IPv4 providers. Since FABRIC bastion hosts are dual-stacked (support both IPv4 and IPv6), this problem goes away

As a result, unlike other environments or testbeds you may have encountered, at least two SSH keypairs are used in FABRIC:

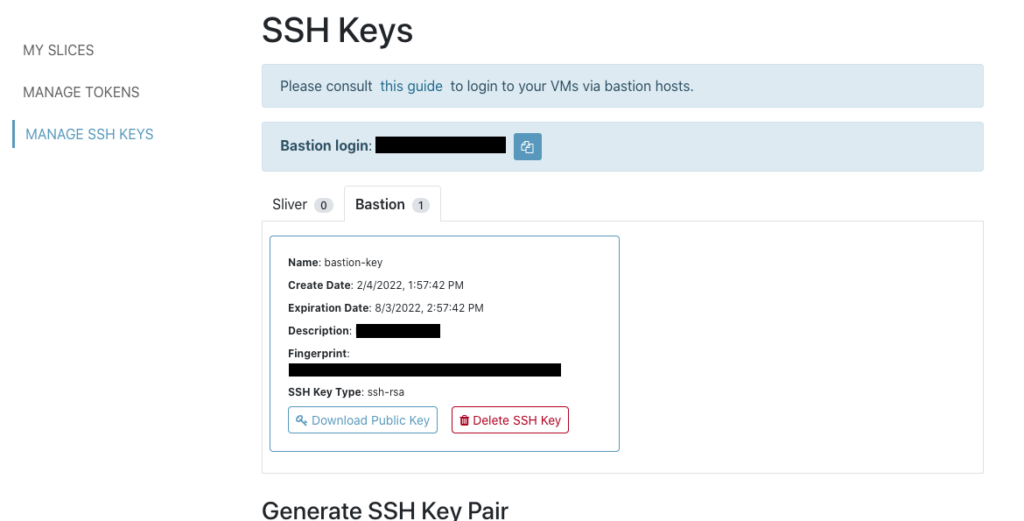
  1. Your ‘bastion’ keypair – this keypair requires rotation, i.e. the keypair has a finite lifetime before it needs to be renewed. The public key of this keypair is stored on the bastion hosts and allows you to ‘hop’ over them into your VM slivers. FABRIC will automatically ‘expire’ this public key and remove it from the bastion host, so you have to periodically generate a new keypair and have the public key uploaded to the bastion hosts.
  2. Your ‘sliver’ keypairs – these keypairs are long lived. The public key of these keypairs is installed into your VM slivers by FABRIC control framework when you create them. You can use multiple keypairs to login to e.g. VMs in different slices, but below we assume you just have one such keypair.

Bastion keys are set to expire after 6 months and must be regenerated before they expire. Sliver keys expire after two years. You can maintain up to 10 bastion keypairs and up to 10 sliver keypairs all expiring at different times. You can always check the expiration time of any key by visiting the ‘My SSH Keys’ section of the Portal.

It is not possible to login to the bastion host itself – this is an intentional security measure. You can only use it to hop over to your VMs as described below.

There are two geographically distributed bastion hosts available. These are load balanced via the name – bastion.fabric-testbed.net

Notice that you and only you are in the possession of private keys within those keypairs – if you lose them, the keypairs must be regenerated. Even if you use FABRIC portal to generate a keypair, the portal allows you to download your private key, but does not store it. FABRIC only stores the public keys.

In addition there are two usernames involved – one on the bastion host and one in the VM sliver. The one used for the bastion host is part of your FABRIC identity and can be found in the portal (see figure below). The one used in the VM sliver typically depends on the image you chose to load and for many cloud-ready images defaults to ubuntu or centos depending on the distribution you are using. Both the Portal and Jupyter Notebooks show you exactly the SSH command you need to issue to login to each VM, including its IP address, your bastion username and the VM image username.

Portal screenshot showing the location of the bastion login

SSH Keypair primer (creating, identifying, fingerprinting keypairs)

To generate a new keypair (regardless of whether it is ‘bastion’ or ‘sliver’) you can use a command-line tool called ssh-keygen found on most modern UNIX (Mac)/Linux systems.

SSH keys can use different *cyphers* and key lengths. FABRIC accepts a subset of available cyphers and keylengths:

  1. RSA keys of length 3072 bits or longer
  2. ECDSA keys of length 256 bits or longer

To generate a new keypair you can use the command as follows (the first parameter indicates keypair cypher, the second key length in bits):

$ ssh-keygen -t rsa -b 3072
Generating public/private rsa key pair.
Enter file in which to save the key (/home/username/.ssh/id_rsa): /home/username/.ssh/fabric_bastion
Enter passphrase (empty for no passphrase):
Enter same passphrase again:
Your identification has been saved in /home/username/.ssh/fabric_bastion.
Your public key has been saved in /home/username/.ssh/fabric_bastion.pub.
The key fingerprint is:
SHA256:1xK3ceE7KJUa8Rdt6/tw+AF1WHacNcUXnGo9iH7c6lQ user@host
The key's randomart image is:
+---[RSA 3072]----+
|          .   +*%|
|           o o XO|
|          o B Oo+|
|           O X.=.|
|        S * *.=E.|
|         . + oo= |
|            ..+.o|
|            .. =.|
|            ..  +|
+----[SHA256]-----+

To create an ECDSA keypair, use ssh-keygen -t ecdsa -b 256 instead.

By default the keys in a keypair are saved under ~/.ssh/ directory as id_<cypher> for private key and id_<cypher>.pub for public key (for instance ~/.ssh/id_rsa and ~/.ssh/id_rsa.pub). In the procedure above the keys are saved as ~/.ssh/fabric_bastion and ~/.ssh/fabric_bastion.pub. They do not have to be, however – you can point to any directory and filename to save them in an alternate location.

When working in the Jupyter Hub we recommend saving keys into ~/work/fabric_config/ directory so they persist across sessions. The traditional ~/.ssh/ location is ephemeral – it gets recreated every time you create a new notebook and any keys saved there are lost.

By convention the filename specified in response to Enter file in which to save the key is used to store the private key and the public key has the .pub extension in the same directory.

Note that key files must have specific permissions set to be usable by the SSH client. Your private key must have permissions set to 0600 or -rw------- (read-writable by you and not readable or writable by anyone else). Your public key has to be visible to everyone with permission 0644 or -rw-r--r-- (read-writable by you, readable by anyone).

When generating multiple keypairs (bastion and sliver) be sure they are named differently and don’t overwrite one another. It is also advisable NOT to use the default ~/.ssh/id_rsa[.pub] keys that you may have already generated for yourself for other projects.

If you look at the generated files the private key will look something like this (this may vary with OpenSSH client version you are using):

-----BEGIN OPENSSH PRIVATE KEY-----
b3BlbnNzaC1rZXktdjEAAAAABG5vbmUAAAAEbm9uZQAAAAAAAAABAAAAaAAAABNlY2RzYS
1zaGEyLW5pc3RwMjU2AAAACG5pc3RwMjU2AAAAQQQKFkHrkVfosif4leHbHuy1ENW1On83
C4KXpbRBuSucJOkWX07zqIwXnDrYPse5qSHjZYwdIGSBJzwJLF36AqziAAAAyHFe8gtxXv
ILAAAAE2VjZHNhLXNoYTItbmlzdHAyNTYAAAAIbmlzdHAyNTYAAABBBAoWQeuRV+iyJ/iV
...

And public key:

ecdsa-sha2-nistp256 AAAAE2VjZHNhLXNoYTItbmlzdHAy......7mpIeNljB0gZIEnPAksXfoCrOI= user@hostname

The keys above are truncated with ....

When looking at the public key you can see it consists of 3 elements – key cypher (ecdsa-sha2-nistp256), key value (AAAAE2VjZHNhLXNoYTItbmlzdHAy……) and comment (user@hostname). You should never modify the first two, however the comment can be edited – it simply helps you identify this particular public key and its purpose.

Whenever SSH documents talk about identity they mean the private key file. As described in the overview, when using FABRIC you are using two of these identities – the bastion and the sliver private keys. You need to indicate to your SSH client which identity to use for which host and this can be tricky, the next section describes how to make it simpler.

One additional useful thing to know is how to get the fingerprint of a key. A fingerprint is a short hash that has a low probability of collision (with any other key) that helps to uniquely identify a key. This is useful sometimes when multiple keys are in play and you want to quickly eyeball if they are different or if they are the same.

To generate a fingerprint of a key you can use the ssh-keygen command as follows:

$ ssh-keygen -E md5 -lf ~/work/.ssh/id_ecdsa
256 MD5:11:22:33:44:55:66:77:88:99:aa:bb:cc:dd:ee:dd:00 keycomment (ECDSA)

FABRIC uses md5 hash type in the portal, when displaying your public keys, you can also use -E sha256 to indicate that you prefer SHA256 hash type. When in doubt which key you are using, you can take its MD5 fingerprint and compare to the one in FABRIC portal to make sure the two fingerprints match.

Note that you can take the fingerprint of either public or private key – the result will be the same. Also note that changing the comment field of the public key does not affect the fingerprint result.

Creating an SSH client configuration file

To make SSH invocations shorter, it is best to create a config file for your ssh client.

If you are on Jupyter Hub, save the file under ~/work/fabric_config/ssh_config so it persists between sessions, if you are working from your own laptop/desktop, you can save it anywhere, for instance as ~/.ssh/fabric_ssh_config.

We do not recommend using the default name ~/.ssh/config as this will by default affect your ssh logins to any host, not just FABRIC VMs.

Also note that recent versions of Jupyter Notebooks that use FABlib 1.2 and above will generate the necessary keys and SSH client configurations as part of the Configure Environment notebook, so if you are using this notebook, the steps described here shouldn’t be necessary.

Make sure you know your FABRIC bastion username prior to proceeding and you have generated your bastion keypair and are in possession of the private key file.

UserKnownHostsFile /dev/null
StrictHostKeyChecking no
ServerAliveInterval 120 

Host bastion.fabric-testbed.net
     User <FABRIC_BASTION_USERNAME>
     ForwardAgent yes
     Hostname %h
     IdentityFile <FABRIC_BASTION_PRIVATE_KEY_LOCATION>
     IdentitiesOnly yes

Host * !bastion.fabric-testbed.net
     ProxyJump <FABRIC_BASTION_USERNAME>@bastion.fabric-testbed.net:22

In the template above replace the things between < > with your own values.

After you’ve done it you can ssh to your sliver simply as ssh -F ~/work/fabric_config/ssh_config -i <private sliver key file> centos@1.2.3.4 from Jupyter Hub or ssh -F ~/.ssh/fabric_ssh_config -i <private sliver key file> centos@1.2.3.4 from your own laptop.

Below we discuss procedures currently in place for managing bastion SSH keys. We expect much of this process to be automated in the near future.

Generating SSH keys and Gaining Access to Bastion Hosts and VM slivers

In order to access your VM slivers in FABRIC you must first have two initial keypairs – a sliver keypair and a bastion keypair. The table below demonstrates the two workflows, depending on whether you want to generate the keypairs yourself or have them generated via the FABRIC portal.

Generating keys yourself Generating keys via FABRIC portal
1 Generate two keypairs following the instructions
in the previous section.
N/A
2 Navigate to the FABRIC portal:
https://portal.fabric-testbed.net
User Profile | My SSH Keys section
Navigate to the FABRIC portal:
https://portal.fabric-testbed.net
User Profile | My SSH Keys section
3 List the contents of your bastion public key
cat mysshkey.pub
Select key type and copy-and-paste the contents into the ‘Public Key’ field of the ‘Upload Public Key’ section of the page
Select key type, fill in key name (short string with no spaces), description (longer sentence) and select Key Type in the ‘Generate SSH Key Pair’ section of the page
4 Click ‘Upload Public Key’ Click ‘Generate Key Pair’
5 N/A Download both the public and the private portions of
the new key pair. Move them to a permanent location in ~/.ssh/ or ~/work/fabric_config/(in Jupyter Hub so it persists) and set permissions on the files as follows (substititing proper key names):
$ chmod 0600 ~/work/.ssh/mysshkey
$ chmod 0644 ~/work/.ssh/mysshkey.pub
6 If you selected ‘bastion’ key type, this public key will automatically be installed into your account on all bastion hosts (typically within 1 minute). If you selected ‘bastion’ key type, this public key will automatically be installed into your account on all bastion hosts (typically within 1 minute).
7 Create the SSH configuration file as described above using the path to the private bastion key and the bastion login name or use the Jupyter Notebook called Configure Environment to do it automatically. Create the SSH configuration file as described above using the path to the private bastion key and the bastion login name or use the Jupyter Notebook called Configure Environment to do it automatically.
Key pair workflows

Note that the bastion host will NOT allow you to login directly, use scp or sftp – this is by design. You can only use it to ‘hop’ to other hosts, like the VM slivers you provision in FABRIC.

At this point you should be ready to access your FABRIC VM slivers using the bastion host(s) from Jupyter Hub as:

$ ssh -F ~/work/fabric_config/ssh_config -i <private *sliver* key file> ubuntu@11.22.33.44

or from your laptop:

$ ssh -F ~/.ssh/fabric_ssh_config -i <private *sliver* key file> ubuntu@11.22.33.44

where 11.22.33.44 is the IP address communicated to you by FABRIC control framework. It can be an IPv4 or an IPv6 address – the bastion hosts will take care of necessary translations. Presumably you used the matching public sliver key file when creating the slice via FABRIC API.

Transferring data between Jupyter Hub or your laptop and your VM

You can use scp command to transfer data between Jupyter Hub or your laptop and your sliver VM.

From Jupyter Hub or your laptop to the VM:

$ scp -F ~/.ssh/fabric_ssh_config -i <private *sliver* key file> <local file name> ubuntu@11.22.33.44~/<remote file name>

From the VM back to Jupyter Hub or your laptop:

$ scp -F ~/.ssh/fabric_ssh_config -i <private *sliver* key file>  ubuntu@11.22.33.44~/<remote file name> <local file name>

Further automation

FABRIC APIs provide the interface with Paramiko toolkit, which helps automate much of the access (however it still requires that you maintain the keypairs for bastion and slivers).

Repeated Login Failures/Automatic IP Bans

If you repeatedly attempt to login to the bastion hosts with e.g. wrong keys from your laptop or desktop, they will automatically ban your IP address for 24 hours, after which you will also automatically be un-banned. Repeated continued failures will result in longer bans and eventually the IP being put on a permanent ban list.

Troubleshooting

To test your bastion host login try the following (substitute the username and the private key path to fabric_bastion):

$ ssh -i ~/.ssh/fabric_bastion -C2T -D 14000 -M -N username_0123456789@bastion.fabric-testbed.net

This command should succeed silently (you can Ctrl-C it). If it does not, try to remedy the reported problem (typical problems include a wrong path to the private key file, wrong permissions on the private key file). Failing that report the problem to FABRIC Forums.

If the test above succeeds you can try a further test that will test the proxy tunnel to your host (substitute the username and the private key path):

$ ssh -i ~/.ssh/fabric_bastion -S /tmp/.sshtest -C2T -D 14000 -M -fN username_0123456789@bastion.fabric-testbed.net
$ nc -z localhost 14000 || echo ‘no tunnel’
Connection to localhost port 14000 [tcp/*] succeeded!
$ ssh -S /tmp/.sshtest -O exit username_0123456789@bastion.fabric-testbed.net
Exit request sent.
Updated on February 1, 2023

Was this article helpful?

Related Articles

Having problems?
Try searching or asking questions in the FABRIC community forums!
Go to Forums

Leave a Comment